Friday, October 11, 2013

DIY Patches for Jeans - Tutorial


My husband hates these jeans. But I love them. They are the most comfortable pair that I own, and I could wear them forever. Some of you might suggest that I rub the pattern and make another pair, but it's not the same.  You see, it's the way the denim has worn down like an old pair of flannel pajamas, making them sleepwear worthy.  However, I've been banned from wearing them, especially to bed, because according to my husband, they are an embarrassment even in the dark.

I don't like doing alterations or repairs much on clothes. It's like cleaning the house for me...pure work and short-lived satisfaction. So instead of sewing just any old patch onto my holy jeans, I decided to make my own. Remember that growing box of scraps that I showed you in my last post? I'm trying to use pieces out of there whenever I can. The leftovers from my daughter's quilt project from two Summers ago have really come in handy. I've used it for interfacing, bias tape, and today, I turned one of the pieces into patches.

It's not a quick and dirty job though. The whole process took me a couple of hours, and the hand stitching was the most tedious, but rewarding. I can't believe I said the words tedious and rewarding in the same sentence.  I'm not a quilter so I don't make appliques too often, but they do come in handy once in a while for apparel detail. These patches are functional and decorative, and can be used for more than just holes. Once you get the hang of it, they can be created to embellish as well as repair garments.

If anyone is interested, here is how I made them using supplies I had on hand:

SUPPLIES
1. Fabric for patches (if your jeans are stretch, you might want to use washable stretch fabric instead). My jeans don't have stretch in it, so I used basic cotton. You can even recycle your jeans into patches for other jeans.
2. Shapeflex from Pellon to add some stiffness to the patch (leftovers from my Weekender Bag).
3. 800 Clear Fuse from Pellon to use as the iron on between the patch and the jeans.
4. Embroidery thread and a nub of good bee's wax. I used a rayon embroidery thread that I had in my stash for a long time. It had a very nice sheen, but not the most sturdy. Try to use sturdier thread.
5. Stitch Witchery hemming tape to iron on edges that lift up or did not adhere to the Clear Fuse.

The rest is pretty self explanatory.

1. Trim the shredded thread around the holes in your jeans.

2. Iron on the Shapeflex according to instructions to your chosen patch fabric. Make sure you have a piece big enough to cover your patch. I covered my complete right knee area because the hole was very big, and I wanted to stabilize the fabric in that area.

3. Place the 800 Clear Fuse behind your patch, but do not iron yet. Make sure that the "sticky" side of the Clear Fuse is against the Shapeflex or the BACK of your patch.  You are creating the adhesive for your patch, which should be the same shape as the patch, see next step.
3. Cut out the shape you want to use as a patch. You can get creative here and cut around the designs on your fabric like I did, or you can make your own. Remember that the 800 clear fuse is on the back, and whatever you cut out of the fabric should be matched on the fuse.

4. Iron your Clear Fuse to the Shapeflex or BACK of your patch.  Leave a little corner UN-IRONED, so there is somewhere you can hold onto when you tear away the Clear Fuse backing to expose the other sticky side.

5. Now tear away the backing of the Clear Fuse.

6. Center your patch on your holes, and iron the patch to your jeans. NOTE: you might need to put a piece of fabric against the inside of your jeans, so the sticky Clear Fuse doesn't fuse to the back side of your jeans.  This is just used like a pressing cloth.  It doesn't stay on, but you could  create a second patch for the back side of the pants, and double up on the patches. This certainly would be much more thick and sturdy. I'd recommend double patches for around the knees of children's pants and maybe even the crotch areas where there is a lot of friction. Make sure your second patch is the same size as the exterior/outside patch. So both can get stitched together.

7, Check the patch edges for areas that are lifting up. If you see them, this is because some of the Clear Fuse adhesive did not make it to your patch.  This is where you would cut out strips of Stitch Witchery and iron it in between the patch and the jeans to hold the patch in place.

8.  Now bee's wax and thread the needle and stitch around the patch.  I used a double-side running stitch (also called a Holbein Stitch). If you don't know how to do this very historic hand stitch, you can learn it HERE. It basically looks like a running stitch except there are no spaces, and both the front and the back look like a continuous stitch.

I left the patch edges raw. You certainly can fold it under before ironing the patch, and then stitching the folded edge afterwards. I thought it might add some bulk so I didn't opt to do that. I might run in the problem of shredding later, but I'm hoping the adhesive will help keep the shredding to a minimum. I like the rustic-looking, (my definition for uneven) stitching.

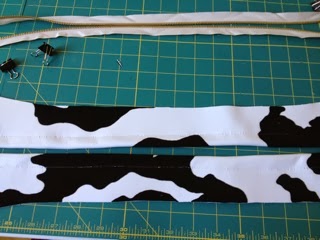
The bottom right patch is what it looked like before I stitched it. 

Another option:
You could always cut the holes much bigger and stitch the patch from behind the hole, and then hand stitch it together. If you decide to use this step, you don't need to use the 800 Clear Fuse application. I decided not to do it that way because I want to reinforce the jean's fabric more. However, I think it would be an interesting look doing the reverse, and I might try it next time. You can see an example of this HERE.

More embellishments:
I was pretty tired after hand stitching all the patches, but you could embellish more by adding seed beads or even sequin to highlight the print. I might do that later...then update a photo. You can see examples of how other people have creatively repaired jeans HERE, HERE, and HERE. There is even a person selling patched jeans on Etsy HERE.

Happy patching!


Tuesday, October 8, 2013

A Bolt of Gray Fleece, Granny Pants, & Underwear

Vogue V8778 Pattern - Took me about two hours to sew.
I think I might add some kangaroo pockets next time. It looks a little plain.
One would think that after completing the Weekender Bag, I'd be pretty tired of sewing this week. It's been the exact opposite! My fingertips are still a bit chafed, but I'm persevering. Hot off my Bernina today is the Katherine Tilton fleece top. A couple of things I did differently, I sewed the collar to the opposite side so it opens up on my right instead of left.  It doesn't really matter if you're not adding the zipper opening. I didn't add the sleeve inserts either. I couldn't find anything to match the fleece, and I prefer vest-like tops where I can layer a long sleeve shirt underneath.
Easy pattern for beginners. I only used three pattern pieces.
I could have gone down a size. I made it in large.
I bought this 10-yard bolt of fleece from Joann's Fabrics last February during a 50 percent sale. The whole thing was about $26 dollars. This averages out to $2.60 a yard. I thought I was getting a ridiculous steel when I got it, and from the outside, the fleece was really soft and cuddly. The fabric is cheap in price, and cheap in quality. What did I expect for $2.60 a yard huh?
I will probably be sick of this fabric by the end of Winter.
After sewing with it, I quickly learned how it can fall apart if there's any seam ripping involved (which I had because I sewed the edges to the collar neckline too long.) I couldn't really fix my collar error without damaging the fabric, so I did a work-around on the stitching, and it's not the "best" but it's not noticeable either. This fleece also deteriorates with any kind of strong heat, and I accidentally melted part of the collar trying to steam down the edges before topstitching. Of course I had to use the slightly melted side as the under collar.

A couple of weeks ago, I posted on the G+ Community group about making some granny pants out of vintage polyester. What I really wanted was something super tapered like pencil pants. I remember wearing pants like this as a kid.  It's cute on kids, and then they turn into granny pants when you get older.

My challenge this week was remembering how to sew in a front fly pant zipper. I don't think I've done one in almost 20 years. I have been mostly sewing side zippers on pants, because I like the clean, flat pant fronts. But I'm looking to make some jeans and cargo pants soon, so I might as well start practicing. As usual, I couldn't figure out the instructions on the pattern.  But who should save the day? Sandra Betzina of course. Here is the tutorial I used online, and it's the BEST out there as far as explaining the process without stressssssssing me out. See her in action HERE.
I used a McCall's pattern for what looks like leggings, but view A, which is the bottom right in the picture below is actually PANTS!!! There are darts and a fly-front zipper. Who would have thought after just looking at these photos.
I think the next time I make these, I will use the legging pattern, which does not have side seams. But I did get the retro look, even though they don't look that great on. So I found someone who looked just like me but wearing a shorter version at the drug store. Hers had pockets, and I thought they were cute. And then I felt better about my granny pants.  :-)
Between the granny pants and fleece top, I decided to try my hand at copying RTW. I chose a pair of underwear that I've been wanting to copy since I saw the Hart's Fabric tutorial HERE.  These were hipsters, which I later adjusted the pattern to some basic briefs, AKA granny panties. Notice a running theme today? I had a t-shirt that was too small for everyone in the household to wear so I decided to use it as my muslin. No good...not enough stretch in the fabric. Wasting a perfectly good t-shirt made me sad.
The front is on the left. See where I taped a belly panel to turn it from a hip style to a brief?
I really liked this t-shirt, but it's child sized.

While I was about to make a t-shirt out of this super cute Paul Frank material, I decided to use a bit of it for my underwear pattern. There was definitely more stretch, but I have to see how it feels after I put in the elastic. It's now sitting in my "Waiting Pile" along with my corset pieces because I don't have the right elastic in my notion's stash. The giant roll of 3/8" elastic I bought off Amazon is actually rubber for bathing suits and too thick. Darn it! (I can't stand having uncompleted projects lying around.)
Yup...I copied and drafted this all by my lonesome.
One of the ladies from my sewing group will be around this weekend to help me with my corset. She's going to show me how to stitch a casing for the boning, and help me with cleaning up the fitting. I decided to do a pre-final version out of thin denim before cutting into my coutil. I still have to order grommet strips, lacing, and the busk. (Argh!) I'll be heading down to Lacis for the corset's steel boning after everything else is assembled and stitched. There's just so many components to organize.  I hope I don't get tired of making corsets after I'm done with this first one. 

I am using the Truly Victorian pattern for my corset.
I also re-shaped my dress form this week to see if I could get it more true to my body. It's okay, but I can't seem to get a true side seam. Making the taped dress form next year will probably really help. I'm trying to organize a class for that in late Winter. For now, I'm hoping the bodice muslin will help. Incidentally, while refitting the bodice, I noticed how my shoulders slope forward. I changed the shoulder line, and added the volume to the back bodice, and it looks pretty good. My body is probably morphing with age. 


I went through my stash again looking for fabric that I have not pre-washed. I found all my Shibori printed pieces I picked up this Summer on EBay, and two huge pieces of cool looking flannel that I've had for about ten years.  Just in time for pajama pants for the family!

After I was done with my projects, I noticed how full my scrap box was getting. There are pieces of material from every project I've made so far in this box. It's almost like a little fabric journal. Happy sewing everyone!


Friday, October 4, 2013

Amy Butler Weekender Bag - Pleather Version - Sew-My-Stash-Away Accessories Challenge

Amy Butler Weekender Bag Completed!
I tied some checkered ribbon at the zipper
handle to make it easier to find.

Inside lining that was attached by hand.

View from the top

You can't see me, but I'm really doing the "Happy Dance" right now.  

If you've been wondering what happened to my sew-my-stash-away challenge...it's alive and well. I have been quietly working on the mother of all handbags: the Amy Butler Weekender. Other than simple totes, this was my first bag that required some real professional handling. 

I bought enough material to make TWO bags.  All the fabric and supplies were taking up a lot of space under my cutting table, and making my room look like I hoard fabric or something.  This is only the first version of the Weekender Bag.  I don't know when I'm going to get around to the second bag.  I feel like I just ran a marathon after finishing this one.  Whew!

Stitching the bag almost broke my machine.  Why? After you account for the many layers of Peltex, interfacing, and pleather, my poor little Juki's heart almost gave out.  After four broken needles, chafed finger tips, and much perspiration, it's finally done.  But the first thing I'm going to tell you is that I didn't follow the instructions exactly because it's pleather, and I needed to reduce some of the layers just to get it under my machine.  I don't think anyone who posts on the internet has made one in pleather. I might have been the first (and last) foolish sewist to attempt such a daunting project.  Which leads to my second realization...I am never going to sew this thing in pleather again. My second version is all fabric...and it should be a breeze compared to this one.

The whole project took me two weeks to finish, and it's best to break it up into increments. I needed a breather every so many hours. Kinda like babysitting an unruly child, we both needed some time outs. The first session should be reading the instructions in its entirety and doing another inventory of supplies before starting. I was still running around getting thread on day one of my cutting.  I probably spent about 40 hours on this bag if you add up all the "thinking" time I took to do the pleather workarounds. If you have to ask...no, this is not really a bag for beginners, and yes, it's a very expensive bag to make. Supplies will run close to $100-plus after you're done, more if you make mistakes. Home decor fabric is more durable, but also more expensive.

Look at all the pieces you have to cut out, and this doesn't count the amount of time
it takes you to make the contrasting piping. 

When I made the piping, I thought I would be "smart" and use some Stitch Witchery on the inside to hold the cording in place without having to stitch it down by machine. Ironing it on still takes a lot of time though.  In the end, the fabric I used didn't adhere to the Stitch Witchery evenly so I ended up sewing it anyway.  This wasted some more time.

I couldn't pin or use any basting stitch that would create holes in the pleather.
I whipped out my trusty painters tape, which is indispensable for taping down
zippers, to taping it to the presser foot so pleather can move smoother.  A Teflon foot
might have made things easier. But the black patches on the pleather is actually
a synthetic velour which helped move the presser foot along.
This is the zipper pieces. It's not clear, but I actually sewed the seamed closed first,
and then attached the zipper.  This is not the right way to do it normally, but had
I basted a stitch and then ripped it out, it would have left holes in the pleather.
I love the purse feet. I realized after buying the Clover purse feet that it
would look too small compared to the weight of this bag. Be sure to get the
larger feet. I found these great domed feet that came in black, and matched
the bag perfectly...don't you think?  See supplier below.

Here are a list of things I did differently, mainly to eliminate bulk:
- I attached the main bag Peltex to the lining.
- I hand-stitched the lining to the bag
- I didn't follow the zipper instructions because one cannot press "open" pleather, nor can one baste any stitches that needs to be removed later without leaving gaping holes. Sewing with pleather is just like sewing with leather...but worse. It's not as pliable, and I actually think it's thicker.
- I extended the straps three inches, which makes it easier to carry on the shoulder
- I added large purse feet (I love them)

Here are a list of things I plan on adding to the next bag (whenever I get to it):
- Add a semi-padded interior pocket to house a small laptop, iPad, or reader
- Add more small pockets and may be a zipper pocket for my wallet
- Add magnetic snaps to the outside pockets
- Add side jump rings
- Use a "D" ring for the strap handles (I just feel like aesthetically, this might look better, but not sure if it might make the bag weaker by breaking up the handles.

Cautionary notes for my next bag:
- Don't sew with pleather unless you have an industrial leather sewing machine (I seriously thought about picking up a secondhand one to complete the bag)
- Have plenty of heavy duty Jeans needles ready, and switch them out a few times during the sewing process. I broke four needles, and used six in total, which means I switched out an unbroken one...or BETTER use leather needles (which I didn't have on hand).
- When ironing the fusible Shapeflex, be careful. Press from the center out, and then trim the edges that get stretched out. Don't put too much weight on the iron. It's very easy to wrinkle, and then distort your fabric on the other side, which doesn't look good. I've seen a few bags on the internet that have wrinkled bodies.
- Oil your machine before you start, and oil it again after you're done.  My Juki sounded like it was hacking and coughing after I was done with the bag, and better again after lubricating.
- Don't use thin or loosely woven fabric for this bag, not even the lining. My red lining was a loose weave, and I found I had to add Shapeflex to it in order for it to keep its shape.  You don't want anything to stretch when sewing this bag.  I bought thick canvas for the lining and piping for my second version.
- Don't be cheap with your thread.  Thread is rather a critical component to sewing the bag.  I used polyester upholstery thread that looked thin, but it was strong.  Let me repeat: don't be cheap about the thread.  You want it to hold all those layers together!

I might consider doing this bag again using real pig skin leather.  Wouldn't that be lovely? I feel like since I can tackle pleather, leather should be easier. In my dreams.

Here are a list of my suppliers:

- Pleather from Discount Fabrics in Berkeley.
- The remainder of the supplies from Joann's Fabrics (including the lining, and interfacings)
- Pattern from The Granary in Sunnyvale, CA (but you can order it anywhere)
- Purse Feet from Pacific Trimming, NY (which is a great place to get all kinds of stuff for bag supplies). I bought the 24mm domed bag feet in black.  Anything smaller, will look weird.