Saturday, August 8, 2015

Late Summer Cotton Lace Dress - Vogue 9062


This is another piece from my last fabric stash swap! (Thanks Ali!) The fabric was a bit unruly to sew due to the loose weave. But it was surprisingly comfortable when I tried it on before I inserted the lining. The fabric is more crochet than delicate lace, and the extra layer of weight made it more of a Spring or late Summer piece. The lining was made by combining silk organza and ivory cotton. See below for more assembly photos.


Keeping the back pattern aligned was challenging. It DID stretch along the back seam. Luckily, I did not need to install a zipper. I had to rip out the back and reposition the pattern again before sewing. It was so frustrating.

I really like my little faux crystal button.
This is one of those patterns with adjustable cup sizes. If you remember, my Frida Kahlo tribute linen dress had the same option, and the cup size ran pretty big for me. I cut it down to a B cup, but made the dart for a size 18 instead of a 16. I thought this was a good compromise since I don't really wear supportive or push-up bras. I also shortened the sleeve by half the length, and omitted the ruffle. This pattern did not disappoint...it really was a Very Easy Vogue pattern. I am considering using this pattern for the guipure lace top. All I need to do is shorten the tunic version. But before I do, I have an eyelet cotton top I want to make first. I swear it will be my final muslin before the guipure. Besides, I can't wear guipure right now...it is too darn hot and humid around here.

I shortened the sleeve by half, and omitted the ruffle.
Here are some photos of how I made the lining. I wanted as much lace to show on the skin without it being too sheer on the main parts of my body. Adding a solid white lining would have hidden the lace, turning a once delicate pattern into an even stark white. This is why wearing beige or ivory underneath white is more natural looking.

I cut the lining very short to show more lace at the hem, and made an organza silk upper bodice and neckline. Using ivory cotton for the body of the dress, provided the right modesty coverage while the organza made the main lining look like it was floating magically on the body.

Dress lining.
You can barely see the silk organza. I also used a very light grey
bias binding for the neckline. I really like the subtle contrast.
To make the lining, I coped the front and back of the dress pattern.
Next, I cut the top of the bodice off and added seam allowances to cut areas.

This is what the first version of the lining looked like. I ended up not using the base organza bottom hem. I also replaced this first version, made of synthetic organza with the proper silk kind. 

Given the limited pattern pieces, there really wasn't much sewing. Most of my time was spent designing and stitching the lining. I certainly feel a lot more confident about making linings for lace now. Happy sewing!
T

Monday, July 27, 2015

Simplicity 1364 Jiffy Vintage Blouse & Guipure Lace Dreams

Simplicity Jiffy Vintage Pattern 1364 
The next couple of projects are mainly pattern and fabric testing before I cut into my recently acquired Guipure lace AKA Venice lace. This Simplicity 1364 vintage-inspired blouse is the first of two patterns I hope to eventually use. After altering the tissue pattern, I cut straight into a Kaufman retro-inspired print I purchased several years back at Stonemountain & Daughter. This print also has quite a bit of stretch; a slightly forgiving option in case some areas are tight. As you can see, it turned out to be a wearable muslin using a woven. I am not so sure if this will work with the Guipure lace without some additional altering at the armscye.

I mostly associate lace with wedding wear, but I feel that there are really many possibilities. There was leather and lace in the 90s, lace and linen has always been a classic Spring pair, and now even with torn up boyfriend jeans.

A window shopping trip this past Spring was the inspiration for my sudden "party dress" themes. I found one RTW rack at a local shop filled with white Guipure lace blouse variations. They were simple lace pieces, no lining, zippers, or buttons. The blouse was meant to be worn over our underpinnings of choice...a clever idea for the consumer, and loads of production savings for the manufacturer.
My future polyester guipure lace blouse fabric, one in white, and other in ivory.
My pattern plans for my Guipure lace blouse is a boat neckline with trumpet sleeves. My sister Judy had an emerald green chiffon dress with exaggerated trumpet sleeves that I have always adored. She wore that dress on the airplane when she immigrated from Hong Kong. I had just turned four years old at the time, and my travel dress was a pink chiffon trimmed with none other than Guipure lace. How did I remember that?

After combing through the Simplicity pattern book last week, I could not find pattern that met my style needs. I suspect trumpet sleeves are not really in fashion. Simplicity 1364 has the boat neck, and the general body cut, but the sleeves are fitted. I could live without the trumpet sleeve, but a couple of inches of ease is necessary for fabric bulk. I am not sure about the zipper insert for Guipure lace. It might end up being more work than originally anticipated.
The back has a 15 inch zipper.
I started with view A and ended up with C. BTW, I think B and C are the same.
Link to the pattern HERE.
Simplicity 1364 was cumbersome. It might have been my fault since I decided to sew Hong Kong seams on the inside. I also used an interfacing meant for men's shirt collars for the facing, which ended up being very stiff and slightly bulky. Although I love the print, I found that the stretch in the fabric slightly distorted my zipper placement. The added Spandex also made the fabric thicker, and too warm for the Summer. The fitted sleeves were tight, and my arm felt claustrophobic, which is why I sans the sleeves entirely. Hey...it's a muslin anyway! But who wouldn't want their projects to turn out the first time?
After setting the first sleeve, I felt it was tight, and the pattern a bit busy.
My unused sleeves. :-(
If I attempt this blouse a second time, I would need to adjust the armhole out. Since I have already cut the pattern down in size, adjusting up at the arms is going to be more work than I would like. Simplicity patterns are going on sale again next week, so I'm picking up another one of these patterns, and starting all over. It is really a lot easier to start fresh than try to work around an already cut pattern. For $1.99, there's nothing to lose right? Right.

Here are samples of Guipure blouses that I like. Stay tuned for more testing news...and happy sewing!

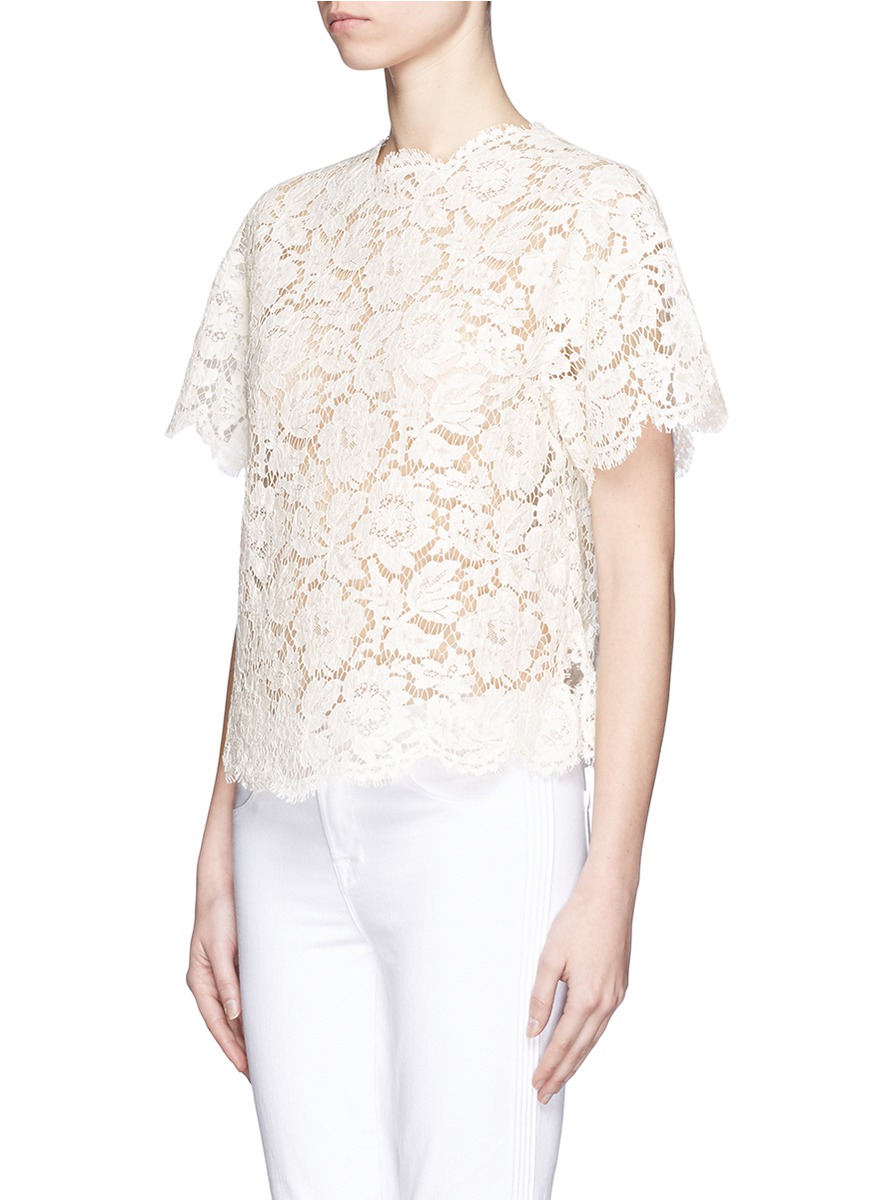
A wide short sleeve is a good option as well. But the lace
used in this cut is not really Guipure, but a whispier ribbed version.
(I just made up the word "whispier." It is not a typo.
Although I have my heart set on a boat neckline, this blouse
is pretty much right on the mark. I think I could live with a basic round neck too. 
Stay tuned...a version of this dress is debuting on my next blog post!


Thursday, July 23, 2015

A Real Summer Dress - Butterick Vintage Dress B5209 & Gusset Hack


After all the adjustments, this dress fits like a glove. I hand stitched the hem and the inside bodice lining.
I was shopping with my sister when I stumbled across this novelty Swiss Dot cotton fabric. I really fell in love with its unique, vintage nature, while my sister thought it a bit dull. It does have an odd grey and pale yellow hue, but I think it only adds to its charm.

Close-up of the bodice. I used silk organza interlining on the wide waistband. It helps hold its shape.

I cut the bodice in a size 16, but extended the waist all the way out to Size 20.
Making a vintage dress was not on my sew list this Summer, but I have become very inspired since attending the History In Fashion exhibit. I took many chances with this project, and I did have several fitting issues with the pattern. First off...I did not make a muslin. I measured and cut the pattern cold turkey. After stitching and fitting the bodice, I discovered two things: the waist was slightly too long, and its width was too small on the waist bottom and too big on the waist top. What you say? Apparently, my back is a lot more curved than I realized. Since the halter back is cut so low, the curve rested at my arch. This is how I fixed it my fitting issue...

I added a gusset in the center to widen the base of the bodice but not the top. This gave me three more inches at the base of the waist. The zipper is on the left side, so this made it easier to adjust. You can see that the added fabric gave it a unique design detail in the back. Notice how the back is more curved now? I needed this to wrap properly around the curvature of my back without bunching.

Gusset addition.
I am terrible at adding gussets, which are usually cut in a triangle. I created a simpler way to add the piece without grief. It does include a center stitch line instead of a smooth triangle. I measured out a piece of fabric, including the seam allowances. I sewed both left and right back bodice pieces to the extension. 

I have created a diagram which might help interested folks...


Then I folded the back in half at the center of the extension piece, and stitched down at an angle. This created a nice even triangle without having to mess with sewing the sharp tip of a regular gusset. Now, if you're really good at gussets, then you don't need to follow my instruction. But my gusset tips are always puckered. This method avoided the pucker, but does add a center seam. Be sure to trim the excess seam with pinking shears. 

If you are not sure about the fitting, baste the angled stitch first and try it on before sewing. This kind of gusset lets you customize your waist as long as you have made the extension piece wide enough. In my case, it was exact.  If the extension was too small, I would have had to cut another piece. Whew! (I can't believe I figured this out myself without Google.) 


This is also my first side zipper. It's not invisible (thank goodness). The zipper has to be added to the main bodice, and then I pick-stitched the lining piece to the zipper. 

Left side zipper was not that easy to put in. 
Inside lining stitched to zipper. 
The top was too big because one, I don't have fullness at the top part of my breast, which also makes for a lower breast dart, and two, the upper back curve is pretty sharp. What this means in a halter bodice is the peek-a-boo nature due to the extra space. I don't want people seeing more than necessary.

I had to adjust the dress in two ways. The first was by adding a dart at each of the back side pieces. I measured four inches from the side seam, and created a 2.5 inch dart. I had to make identical adjustments to the lining as well. See it here...

Look closely to see the dart.
Then I had to adjust the neck strap. The back of the neck strap piece is curved. I thought I was supposed attach a button, but the directions said to sew the left and right pieces together. I had difficulty doing this because of the curved pattern ends. Then after sewing them together, I realized that I needed to pull the straps up in order to fit the front bodice tighter. At this point I did not want to rip it apart because my delicate fabric was starting to fray. I just sewed the straps together at an angle, which tightened up the edge of the halter that wrapped around the breast and to the back. Then I just sewed the ugly seam down by hand. Since the seam is hidden...no biggie.


Looks fine once it is back in place.
Lastly, I cut one inch off the bottom of the waistband to accommodate my shorter length. This prevented crinkling in the midsection and automatically raised the hem slightly without losing fullness at the base of the skirt. By doing this I also saved time without having to redo the gathers from the top of the skirt.

I did not pay enough attention to the neck strap instructions beforehand. If I had to do it all over, I would have adjusted and sewn down the front neck strap after completing the gusset and dart adjustment before sewing the bodice lining. This would have prevented the exposed seam.

Here is a few shots of the pattern pieces to provide a preview to folks interested in sewing this dress.


There was also the odd instruction to understitch the lining bodice, and it read "Understitch the lining as far as possible." What? As far as possible? Well, the instructions were correct. After sewing the lining bodice, there is not enough space to stay stitch the whole piece. This sorta irked me.


To line or not to line? The fabric is slightly sheer, but I don't want to add more poof to the waist gathers so I opted out. My only regret is that I did not finish the skirt seams. Overall though, I had many glitches which were due to my not paying enough attention. I don't count fitting issues glitches. I learned much about making halter dresses, and something new about the shape of my body. The result was a dress that fits like a glove!

Happy sewing!